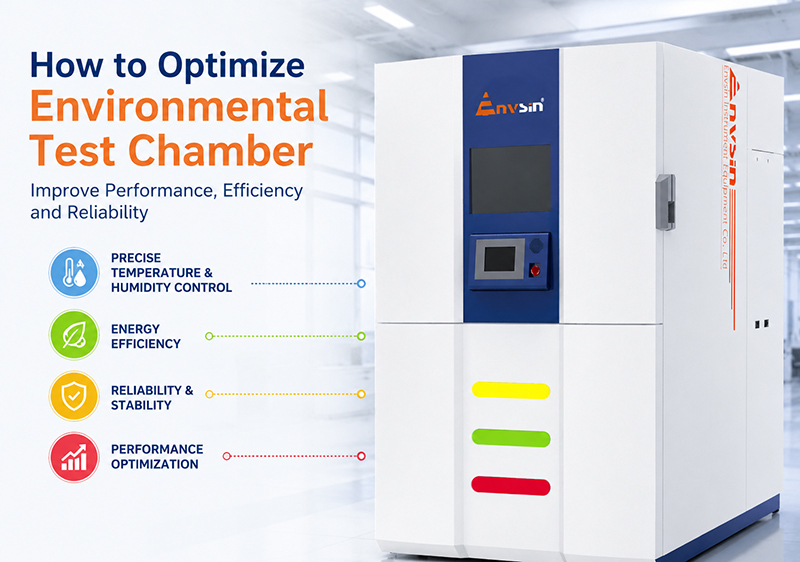
Ever run a 500-hour temperature cycling test only to find inconsistent readings halfway through? That frustration is exactly why optimizing your environmental test chamber matters more than you think. Whether you’re validating automotive components or medical devices, a finely tuned chamber cuts downtime, lowers energy bills, and delivers data you can actually trust. At Envsin, we’ve helped hundreds of labs worldwide turn underperforming chambers into precision workhorses. Let’s walk through practical steps that make a real difference—without the fluff.
Why Calibration Is the Cornerstone of Optimization
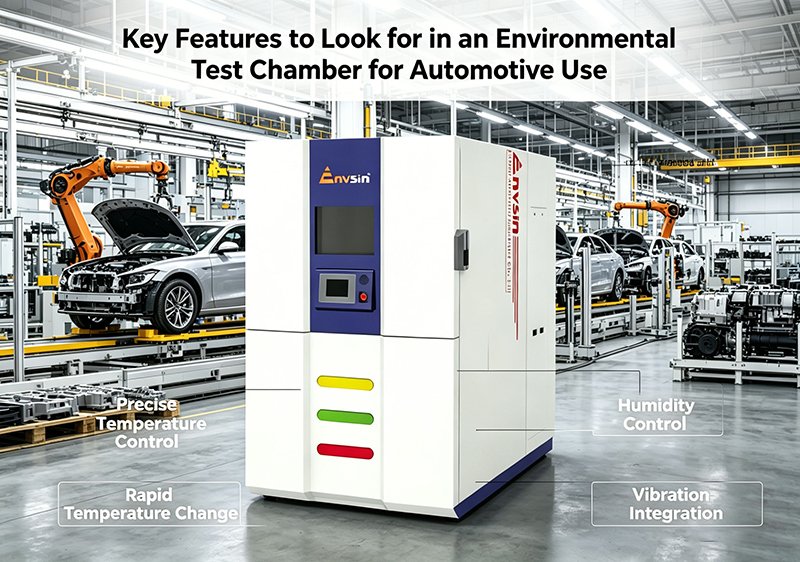
You cannot optimize what you do not measure accurately. Even a brand new cámara de pruebas ambientales drifts over time due to sensor aging and thermal load variations. Start with a full two-point or three-point calibration for temperature and humidity sensors at least once every 12 months. Use a reference sensor traceable to NIST or equivalent standards. Many operators overlook this and then struggle with false failures. A calibrated chamber ensures your environmental test chamber reproduces real-world conditions exactly as intended, from altitude simulation to rapid temperature change tests.
Master Airflow and Load Distribution
One hidden culprit of poor repeatability is uneven airflow inside your environmental test chamber. When product samples block air ducts or are stacked too tightly, you create hot spots and cold pockets. For optimal performance, maintain at least 15% free space around each test specimen. Install additional wire racks or perforated shelves to allow uniform circulation. At Envsin, we often see labs reduce test deviation by nearly 30% just by reorganizing chamber loads. Also, keep the evaporator and fan blades clean; dust accumulation silently degrades performance over weeks.
Leverage Programmable Logic and Ramp Rate Control
Modern environmental test chambers come with advanced controllers, but many teams never adjust the default PID parameters. Tune the proportional-integral-derivative loop to match your typical ramp rates and thermal mass. Slower ramp rates minimize overshoot, while faster rates save time but require tighter control. Use the chamber’s self-tuning feature, then verify results with a dry run. For example, when performing damp heat tests (85°C/85% RH), a stable chamber avoids condensation drips that ruin samples. Small tweaks in the controller settings can transform your environmental test chamber from erratic to rock-solid.
Preventive Maintenance That Actually Pays Off
Don’t wait for an alarm to replace the refrigerant filter or clean the condenser coils. Create a monthly checklist: inspect door gaskets for cracks, check humidity water quality (use distilled water to avoid mineral scale), and listen for unusual compressor noises. A neglected refrigeration unit forces the chamber to work harder, increasing energy use by up to 25%. Also, replace air filters every three months. These simple habits extend the lifespan of your environmental test chamber and slash unplanned service calls. Remember: optimization isn’t a one-time event—it’s a continuous cycle.
Data Logging and Real-Time Monitoring
Your chamber already collects valuable data, but are you using it? Connect your environmental test chamber to a cloud or local SCADA system to track deviations in real time. Set alerts for temperature drift beyond ±0.5°C or humidity divergence. Historical logs help you spot degradation patterns before they cause failures. For regulated industries like aerospace or electronics, detailed records also ease audit trails. Envsin’s chambers integrate with standard protocols, so you can optimize test sequences remotely. No more manual spreadsheets — just actionable insights.
Reduce Energy Waste Without Compromising Performance
An oversized or poorly insulated chamber can double your electricity bill. Check the chamber’s thermal insulation integrity, especially around door seals and cable ports. Use the ‘economy mode’ if available, or program the unit to enter standby between test cycles. Another pro tip: pre-condition samples at ambient temperature before loading them into the environmental test chamber – this reduces the stress on the heating and cooling system. Additionally, schedule tests back-to-back to minimize warm-up phases. Smart energy management not only saves costs but also supports green lab initiatives, something that matters deeply for modern European and North American buyers.
When to Upgrade or Retrofitting Components
Sometimes optimization means upgrading key parts like humidity sensors, compressors, or control panels. If your chamber is over seven years old, retrofitting a new touchscreen controller with Ethernet connectivity can drastically improve usability and data accuracy. Envsin offers retrofit kits that breathe new life into legacy units. Before replacing the whole environmental test chamber, evaluate the ROI of retrofitting. Many facilities achieve 90% of the performance of a new unit for a fraction of the price. Partner with an expert who understands your testing profile and climatic requirements.
Optimizing an environmental test chamber isn’t just about following a checklist; it’s about developing a proactive mindset. Start with calibration and airflow, fine-tune your controller settings, and adopt a maintenance rhythm that fits your lab’s schedule. The result? Shorter test cycles, lower operational headaches, and credibility every time you present test results. At Envsin, we design chambers that are built for optimization from day one, yet the right practices make any unit perform better. Ready to boost your chamber’s accuracy and efficiency? Implement these steps today, and your reliability data will thank you.